
At Kilimanjaro’s Uhuru Peak, summit-night temperatures are usually around -15°C to -25°C, and wind can make the cold feel even more intense. A good plan for Kilimanjaro summit night temperature and layering strategy starts with a moisture-wicking base layer, warm insulation and a windproof outer shell.
It’s natural to focus on the thermometer, but comfort also depends on keeping sweat away from your skin and adjusting layers as your effort and the weather change. The right combination helps you prepare for the long, exposed summit push without overheating on the climb.
This guide explains how cold the summit can feel, what each upper-body layer does and how to adapt your clothing from lower camps to summit night. You’ll also learn why your warmest layers matter most when you stop moving and how to balance warmth with comfort as you climb.
Key Takeaways
- Prepare for summit-night temperatures around -15°C to -25°C, with wind making exposed sections feel colder.
- Cover your head, face and hands, and use warm socks to help protect extremities during the summit push.
- Build upper-body warmth with a moisture-wicking base layer, insulating mid-layers and a windproof outer shell.
- Adjust layers as your effort changes: avoid overheating while walking and add warmth promptly when you stop.
What is the temperature at Kilimanjaro summit?
Uhuru Peak rises to 5,895 metres, where summit-night temperatures commonly range from -15°C to -25°C. Higher altitude brings thinner air and colder conditions; season also matters. Listed summit-night ranges are -10°C to -15°C in March and -15°C to -22°C in July. Wind can make the exposed climb feel colder than the thermometer suggests. A sound Kilimanjaro summit night temperature and layering strategy accounts for both the season and wind exposure.
Weather affects how quickly you lose warmth. On an exposed ridge, wind chills uncovered skin, while sweat can leave fabric cold against your body. The final stretch toward Uhuru Peak is especially exposed. Keep your layers dry, cover gaps at your collar and wrists, and follow your guides’ advice as conditions change. These steps are central to a practical Kilimanjaro summit night temperature and layering strategy.
Protect your head and face before setting out. A warm hat should cover your ears, while a balaclava or neck gaiter shields your cheeks and neck. Pull the face covering up when the wind picks up, then adjust it if your breath makes the fabric damp. This helps limit moisture against your skin.
- Gloves: Use two pairs: thin inner gloves for handling equipment and thicker insulated outer gloves for warmth. Mittens or shell mittens can add protection for cold hands.
- Socks: Choose warm socks that fit comfortably inside your boots. Avoid a tight fit, which can reduce room for insulation around your toes.
- Boots: Insulated footwear helps protect your feet on the cold, exposed summit approach. Keep socks and boots dry before the climb.
Protect your hands, feet, ears and cheeks throughout the climb. If you need to handle equipment, keep your thin gloves on and remove only the outer pair. Put them back on promptly. A neck gaiter can also be raised or lowered as your effort and the wind change.
Before leaving camp, place your hat, face covering and gloves within easy reach. Check that your boots, socks and layers are dry. If you’re preparing to climb Kilimanjaro, this simple check makes it easier to keep insulation in place as conditions shift.
Cold-weather preparation and adjustment during the climb
Preparing for Kilimanjaro means adapting your clothing, food and fluids as effort and exposure change. Summit departures often begin around midnight, so organize essential layers before resting.
Lower-Body Layers for Changing Conditions
Lower-body layering combines thermal bottoms with trousers and a protective outer shell. It matters because walking effort and exposure shift between camps and summit slopes. Pack two base-layer bottoms, one midweight and one heavyweight, or fleece tights for colder stretches. Waterproof trousers weighing 200-300g can also block wind above the forest zone. During warmer climbs, unzip or remove a layer before sweat builds. At camp, change into dry clothing rather than resting in damp trekking trousers.
Cold-Weather Safety and Staying Dry
Stay dry by managing sweat, rain and frozen gear before they chill you. During March-May and November, rain can make waterproof trousers useful well below the summit. Open your outer layers before you overheat, then close them when you stop. Add warmth promptly at camp, where inactivity lets your body cool. Water bottles and hydration tubes may freeze in severe cold, so protect them inside clothing or insulated storage. Keep snacks accessible too, since frozen food can be difficult to eat. Store a phone or camera close to your body, as cold can drain its battery faster.
Summit Cold and Wind Chill
Wind chill is the extra cooling effect of moving air across exposed skin. During the summit push between 2am and 7am, temperatures at Uhuru Peak can range from -10°C to -20°C, while winds may exceed 40km/h. A windproof shell helps block that exposure. Keep your face covered and avoid leaving skin bare during pauses. As sunrise approaches, conditions may feel different, but don’t remove warm layers until your effort and surroundings support it.
Before midnight, lay out dry clothing, water and snacks so you can find them quickly in the dark. Ask your guides about the planned departure and expected conditions, then adjust your packing. For help shaping a route around the climb, explore Kilimanjaro trek planning.
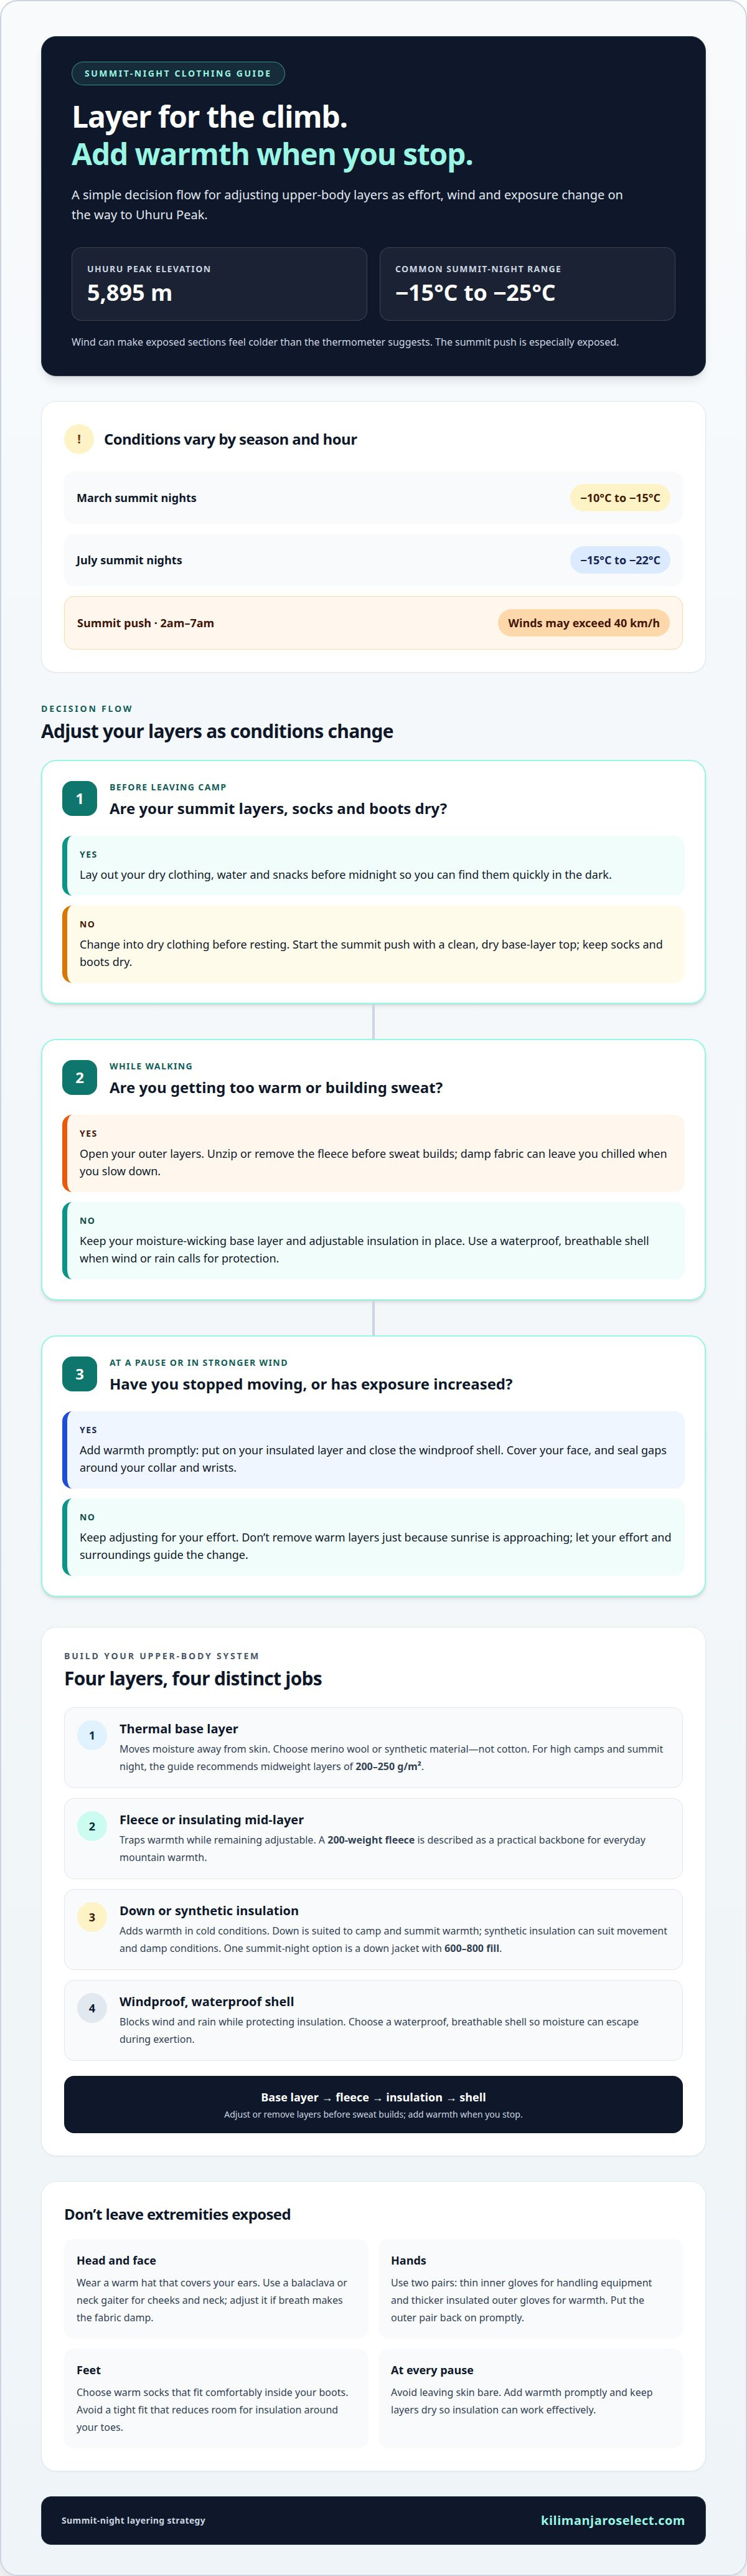
Upper-body base layers, fleece, insulation and shells
A useful system combines thermal, insulating, windproof and waterproof clothing. Each layer has a distinct role as your effort and exposure change on Kilimanjaro’s routes.
Thermal Base Layers
A thermal base layer sits next to your skin and moves moisture away. That matters because damp fabric can leave you chilled when you slow down. Choose merino wool or synthetic material, not cotton, which holds moisture. For high camps and summit night, midweight base layers of 200-250 g/m² provide a warmer starting layer. Pack a clean, dry top for the summit push.
Fleece and Insulating Mid-Layers
A fleece or insulated mid-layer traps warmth above your base layer. It gives you adjustable insulation during changing effort, without needing to hike in a heavy down jacket. A 200-weight fleece is a practical backbone for everyday warmth on the mountain. Add it over your thermal top in cool conditions, then unzip or remove it before sweat builds during a climb.
Down and Synthetic Insulation
Down and synthetic insulation provide extra warmth when the air approaches freezing. Down offers a warm camp and summit layer, while synthetic insulation can suit movement and damp conditions. Keep either layer dry so it can insulate effectively. For summit night, a down jacket with 600-800 fill is one recommended option. Choose an insulated layer that fits over fleece without restricting movement.
Windproof and Waterproof Shells
A shell blocks wind and rain while protecting the insulation underneath. It matters because exposed ridges can feel colder when wind cuts through clothing. Choose a waterproof, breathable shell that lets moisture escape during exertion. Wear it over your base layer, fleece and insulated jacket when conditions call for protection. Adjust the zip as your effort changes to prevent sweat from building up inside.
Summit-night layering strategy
At altitude, summit clothing must balance warmth, moisture control and wind protection. A deliberate layering system helps you adapt from the midnight start through sunrise.
Summit-Night Clothing and Gear
Wear a thermal base layer, warm mid-layer, insulated jacket and waterproof, windproof shell. This combination helps protect you during the exposed trekking hours, when wind can exceed 40km/h.
For your lower body, combine thermal bottoms with insulated trousers and a waterproof outer layer. Wear insulated gloves, a warm hat and a face covering, such as a balaclava or neck gaiter. These layers provide coverage while allowing you to walk and handle equipment. Keep your shell accessible so you can adjust it as exertion and wind change.
At Stella Point, assess how cold you feel before continuing toward Uhuru Peak. The exposed stretch can feel colder than sheltered camps, even as sunrise nears. If you stop, close open layers and cover exposed skin. If you overheat while moving, loosen a zip before sweat dampens your clothing. The aim is a dry, adjustable system, not simply the thickest outfit.
Guides’ Clothing Recommendations and Provision
Guides recommend summit clothing that combines thermal, insulating, waterproof and windproof protection. Each layer performs a separate job during the climb.
Use your guide’s advice to adjust the layers you’ve packed for the route and conditions. A useful setup includes a moisture-wicking top, fleece, insulated jacket and protective shell, alongside warm trousers, gloves and face protection. Guides’ recommendations describe what climbers should wear; they don’t establish that guides provide each clothing item. Keep your equipment together before resting, so it’s ready for the departure.
From forest paths to the high summit approach, the adventure brings changing effort and exposure. Prepare your clothing before departure, then make small adjustments while trekking. A warmer layer belongs over your fleece when you pause, while a vented shell can help limit sweat uphill. Plan your Kilimanjaro trek with a route that suits your climb.
Kilimanjaro Select
Kilimanjaro Select offers Kilimanjaro treks for travelers ready to put summit-night preparation into practice. Choose from the 7 Days Machame Route Kilimanjaro Trek, the 8 Days Lemosho Route Kilimanjaro Trek, or the 6 Days Marangu Route Kilimanjaro Trek. Each gives you a route option to consider as you plan your climb and prepare for changing temperatures.
If you’re choosing an itinerary, start with the route and trek duration that fit your plans. Once you’ve chosen your climb, prepare your layers for the expected summit-night conditions and the days you’ll spend on the mountain.
Contact Kilimanjaro Select to discuss your Kilimanjaro trek.
Choose Your Route and Begin Planning
Your Kilimanjaro summit night temperature and layering strategy can guide more than your packing. Let it shape how you think about the route, the rhythm of your climb and your preparation before arriving in Tanzania. A clear itinerary gives you a practical starting point for organizing your days on the mountain.
Kilimanjaro Select offers the 7 Days Machame Route Kilimanjaro Trek, the 8 Days Lemosho Route Kilimanjaro Trek and the 6 Days Marangu Route Kilimanjaro Trek. Each offers a different route and duration to consider as you plan your adventure. Choose the option that best fits your travel plans, then turn your attention to preparing for the climb.
When you’re ready to discuss your next step, contact Kilimanjaro Select. May your preparations lead to a rewarding journey and a memorable sunrise on the mountain.
Frequently Asked Questions
How cold is Kilimanjaro at night by route?
Night temperatures vary with elevation and camp, rather than following one fixed temperature for each route. On the Marangu Route, July nights at Horombo Huts range from -3°C to 2°C, while Kibo Hut ranges from -10°C to -5°C. On routes using Barranco Camp, nights are typically 0°C to 5°C. Higher summit camps are colder, so prepare for changing conditions as you gain altitude.
Is it really that cold at the summit?
Yes, summit conditions can be severely cold, especially during an exposed night ascent. Temperatures at Uhuru Peak can fall to -15°C to -25°C, and wind can make them feel colder. The actual experience depends on wind, cloud and how long you remain exposed. For example, waiting on an open ridge feels different from resting at a sheltered camp, even on the same climb.
What happens at Stella Point or Gilman’s Point?
Stella Point and Gilman’s Point are crater-rim points reached by different summit approaches. Climbers coming from Barafu normally reach Stella Point, while those approaching from the Marangu side normally reach Gilman’s Point. From either point, those continuing toward Uhuru Peak follow the crater rim, then descend to a lower camp later that day. The rim can be windy and exposed.
What happens before the summit departure?
Climbers usually wake around 11pm, with many summit departures beginning around midnight. Before resting, organize clothing and essential gear so preparation in the dark is straightforward. The departure time varies with route, camp, weather, group pace and the guide’s plan. At camp, change out of damp trekking clothes and keep summit items within reach, rather than searching through your packed gear at departure.
What is the coldest month on Kilimanjaro?
July is the coldest month in the listed summit-night temperature ranges, at -15°C to -22°C. January is also very cold, with listed temperatures of -15°C to -20°C. These ranges describe summit conditions, not every camp or hour. Wind and exposure affect how cold the climb feels, so use the seasonal figures to plan clothing without assuming every night will feel identical.
What should be in your summit-night daypack?
Pack your headlamp, water, snacks, spare warm layers and any small essentials you’ll need during the ascent. Summit-night headlamps are recommended to provide more than 100 lumens and a beam longer than 70 metres. Keep your phone or camera close to your body, since cold can drain batteries faster. Water bottles and hydration tubes may freeze, so check them during the climb.


